
How to Add VMware Paravirtual SCSI (PVSCSI) adapters
A few months before the vSphere release VMware showed some amazing stats in regards to the increased level of I/O that can be attained in a virtual infrastructure. They posted this info on their blog and the outcome of the testing was impressive. They were able to achieve 350,000 I/O operations per second on a single vSphere host (ESX 4.0) and with just 3 virtual machines. Their testing utilized the EMC Enterprise Flash Drives, which have an incredibly high throughput. They talked about how the VMware Paravirtual SCSI (PVSCSI) adapter was able to achieve 12% more throughput with 18% less CPU cost compared to the LSI virtual adapter.
Those stats are equally impressive, since being able to achieve an almost 20% CPU decrease while increasing performance means more density per virtual host. This further allows companies to squeeze more resources from their virtual infrastructure without needing to purchase more hardware. And in this economy, everyone is trying to get their money’s worth when it comes to their infrastructure capital spending.
Since PVSCSI adapters are not supported for boot devices (they work, just not supported by VMware), you will need to add a 2nd hard drive to use the PVSCSI adapter. When setting up a new virtual environment on vSphere for a client, it wasn’t clear where exactly that option is located. It seemed when adding a 2nd hard drive, it just used the existing SCSI adapter. On the VMware KB site, I found KB article [1010398](http://kb.vmware.com/selfserv ice/microsites/search.do?cmd=displayKC&externalId=1010398) which talks about the steps to set that up. Below are the details from the VMware KB site.
The most important step is #12, you NEED to select a SCSI adapter that starts from SCSI (1:0) through SCSI (3:15). Selecting the next available SCSI interface, eg. SCSI (0:1), uses the boot volume SCSI adapter.
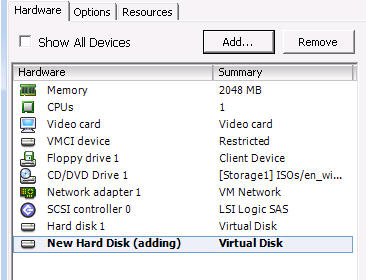
When you select SCSI (1:0) or higher, you’ll see the new SCSI controller added.
Note: Booting from a disk attached to a PVSCSI adapter is not supported. The system software must be installed on a disk attached to an adapter that does support bootable disk.
- Launch a vSphere Client and log in to an ESX host system.
- Select a virtual machine, or create a new one.
- Ensure a guest operating system that supports PVSCSI is installed on the virtual machine. Currently: _Windows Server 2008 Windows Server 2003 Red Hat Enterprise Linux (RHEL) 5
- In the vSphere Client, right-click on the virtual machine and click Edit Settings.
- Click the Hardware tab.
- Click Add.
- Select Hard Disk.
- Click Next.
- Choose any one of the available options.
- Click Next.
- Specify the options your require. Options vary depending on which type of disk you chose.
- Choose a Virtual Device N**ode **between SCSI (1:0) to SCSI (3:15) and specify whether you want to use Independent mode.
- Click Next.
- Click Finish to finish the process and exit the Add Hardware wizard. A new disk and controller are created.
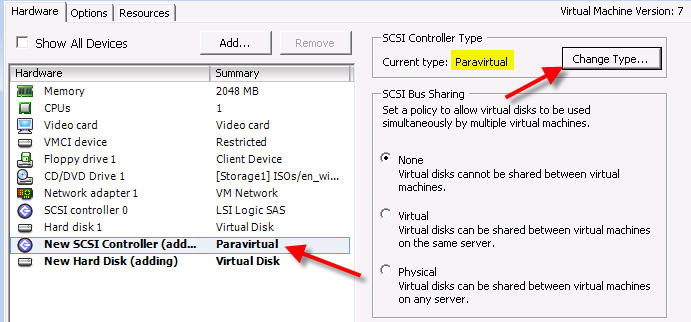
- Select the newly created controller and click Change Type.
- Click VMware Paravirtual and click OK.
- Click OK to exit the Virtual Machine Properties dialog.
- Power on the virtual machine.
- Install VMware Tools. VMware Tools includes the PVSCSI driver.
- Scan and format the hard disk.
I hope this helps anyone who wants to use the PVSCSI adapter, but is having trouble locating how exactly you add it to your virtual machine. This vSphere update and the [blog article](http://blogs.vmware.com/performance/2009/05/350000-io-operations-per- second-one-vsphere-host-with-30-efds.html) referenced above from the VMware website is just another example that shows if you size your virtual environment correctly, you can virtualize even your highest demanding I/O enterprise applications.